Effective Weeknight Dinner: Fast and Tasty Chicken Fajitas Recipe
# Sheet Pan Chicken Fajitas: A Fast and Simple Dinner Option
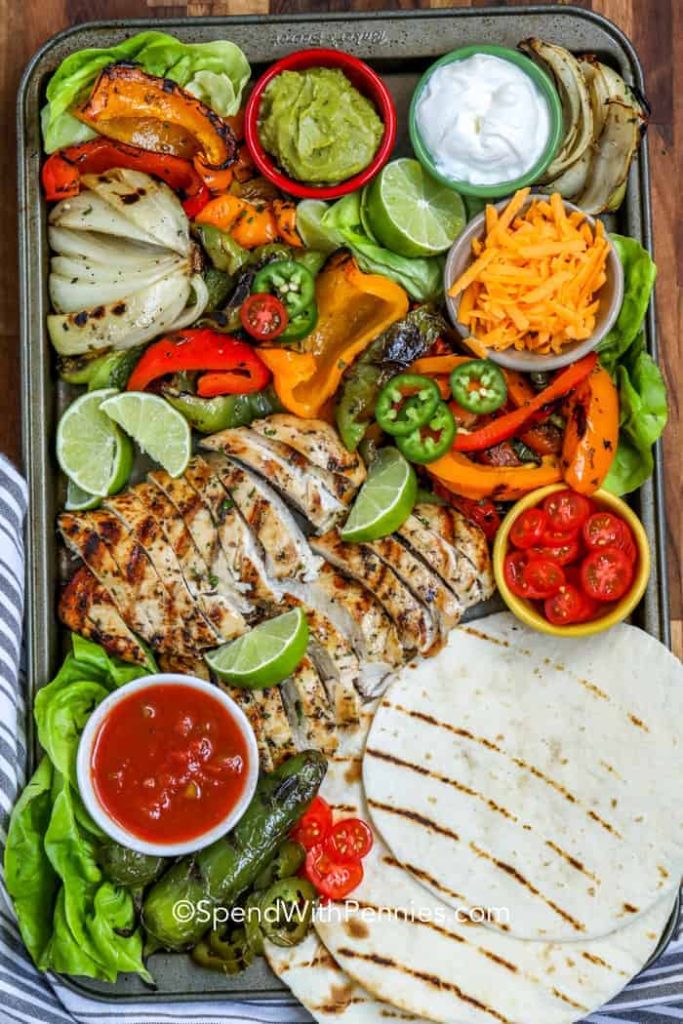
Sheet pan chicken fajitas are an excellent choice for hectic evenings when you crave a tasty meal with little cleanup. This one-pan meal allows all the ingredients to cook simultaneously, making it effortless to serve and enjoy. Set out tortillas and toppings, and let everyone create their own fajitas for an engaging dining experience.
## Flavor Profile
These fajitas offer a delightful mix of smoky and tangy flavors with a touch of sweetness. The succulent chicken, vibrant lime, and caramelized peppers yield a bold and comforting taste that will fulfill your cravings.
## Skill Level
Preparing sheet pan chicken fajitas is incredibly simple. With just a few easy steps—seasoning, slicing, and roasting—you can have a scrumptious dish ready in no time.
## Make Ahead
To save time, you can prepare the ingredients beforehand. Cut the vegetables and combine them with the seasoning up to one day before cooking. This allows you to just place everything in the oven when it’s time to eat.
## Ingredient Swaps
Feel free to personalize your fajitas! You can use taco seasoning or ready-made fajita seasoning for convenience. If you enjoy a bit of heat, consider incorporating fresh jalapeños or cayenne pepper.
## Serving Suggestions
These fajitas are adaptable and can be enjoyed in different ways. Serve them in warm tortillas, or experiment with rice bowls, salads, or quesadillas for a different take.
## What You’ll Need
– **Chicken**: For the juiciest outcomes, slice boneless chicken against the grain. Boneless chicken thighs are a great substitute, as they stay tender during cooking.
– **Veggies**: Yellow onions provide a sweeter flavor, while red onions deliver a sharper one. Use a mix of bell peppers for visual appeal and added sweetness.
– **Seasonings**: A mix of warm spices and smokiness is crucial. You can double the seasoning recipe to keep some on hand for future meals or choose store-bought seasoning.
## How to Make Sheet Pan Fajitas
1. **Mix Seasonings**: In a bowl, combine olive oil, lime juice, chili powder, salt, cumin, smoked paprika, onion powder, black pepper, and garlic powder.
2. **Prepare Ingredients**: Slice the chicken and vegetables, then add them to the bowl with the seasonings and stir well.
3. **Bake**: Spread the mixture on a large baking sheet and bake at 425°F for about 15 minutes, or until the chicken achieves an internal temperature of 165°F. For a charred finish, broil for an additional 3-5 minutes.
Serve the fajitas hot in warm tortillas with toppings like sour cream, salsa, pickled jalapeños, and cheese.
## Tips for Success
– Ensure that the chicken and vegetables are cut to similar sizes for uniform cooking.
– Avoid overcrowding the sheet pan; use an extra-large rimmed baking sheet or multiple pans if necessary.
– For a restaurant-style char, broil the fajitas for a few minutes at the end of cooking.
– Warm tortillas in foil in the oven or use a tortilla warmer to keep them soft.
## Storing and Reheating
Leftover fajitas can be stored in an airtight container in the refrigerator for up to 4 days. Reheat in a skillet or microwave until warmed through. For longer storage, freeze the chicken and peppers together for up to 2 months. Thaw in the fridge and reheat in a hot skillet to regain texture.
## Conclusion
Sheet pan chicken fajitas are a quick, easy, and flavorful dish perfect for busy evenings. With minimal cleanup and the flexibility for everyone to customize their own, it’s a win-win for families and gatherings alike. Enjoy this delightful Tex-Mex meal any night of the week!
Weekly Meal Schedule: Protein-Rich and Fiber-Enriched Diet
**Weekly Meal Plan: Protein-Rich and Fiber-Rich Diet**
Incorporating a protein-rich and fiber-rich diet can serve as a beneficial method for individuals aiming to enhance their general well-being, support muscle development, and improve digestion. This meal plan offers a well-rounded strategy for achieving these nutritional objectives, guaranteeing that each day is filled with appetizing and healthful choices.
**Day 1:**
– **Breakfast:** Greek yogurt parfait featuring assorted berries and a dash of chia seeds.
– **Lunch:** Grilled chicken salad comprising mixed greens, cherry tomatoes, cucumbers, and balsamic vinaigrette.
– **Dinner:** Baked salmon accompanied by quinoa and steamed broccoli.
– **Snack:** Slices of apple served with almond butter.
**Day 2:**
– **Breakfast:** Scrambled eggs with spinach and feta cheese, alongside whole-grain toast.
– **Lunch:** Lentil soup paired with whole-grain crackers.
– **Dinner:** Turkey stir-fry featuring bell peppers, snap peas, and brown rice.
– **Snack:** Carrot sticks served with hummus.
**Day 3:**
– **Breakfast:** Overnight oats made with almond milk, topped with banana slices and walnuts.
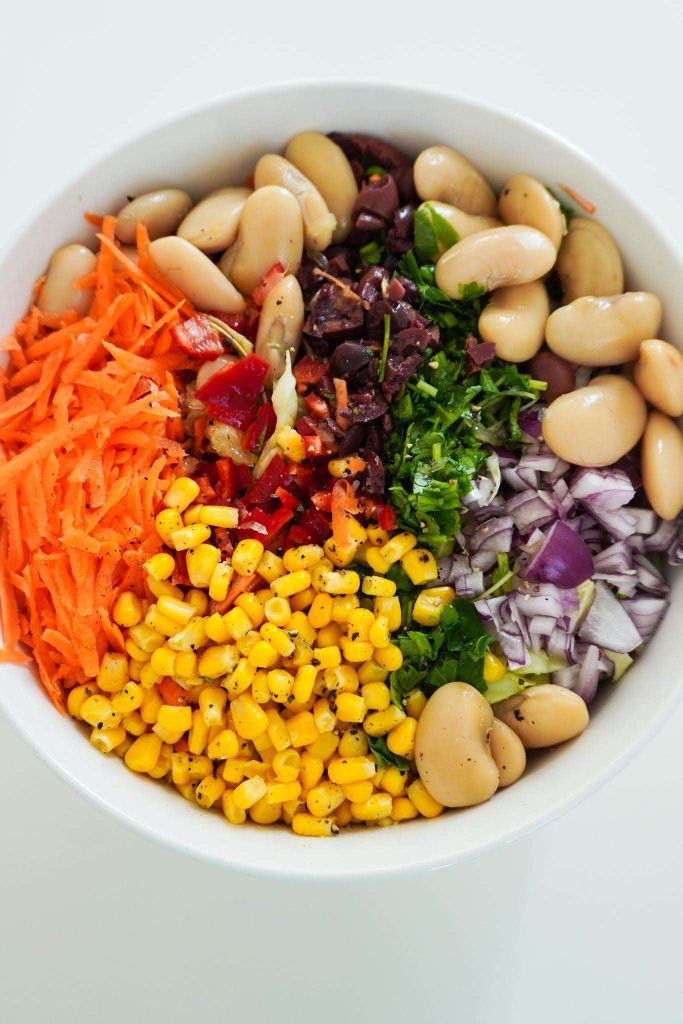
– **Lunch:** Quinoa and black bean salad enriched with avocado and lime dressing.
– **Dinner:** Grilled shrimp tacos served with cabbage slaw and corn tortillas.
– **Snack:** Cottage cheese paired with pineapple chunks.
**Day 4:**
– **Breakfast:** Smoothie blending spinach, protein powder, banana, and almond milk.
– **Lunch:** Chickpea and avocado wrap in a whole-grain tortilla.
– **Dinner:** Baked chicken breast served with roasted sweet potatoes and green beans.
– **Snack:** A mix of nuts and seeds.
**Day 5:**
– **Breakfast:** Whole-grain pancakes topped with fresh berries and a scoop of Greek yogurt.
– **Lunch:** Tuna salad combined with mixed greens, cherry tomatoes, and lemon vinaigrette.
– **Dinner:** Beef and vegetable stir-fry with brown rice.
– **Snack:** Celery sticks served with peanut butter.
**Day 6:**
– **Breakfast:** Omelet featuring mushrooms, tomatoes, and cheese, served with a side of fruit.
– **Lunch:** Quinoa bowl filled with roasted vegetables and tahini dressing.
– **Dinner:** Grilled pork chops with barley and sautéed spinach.
– **Snack:** Edamame sprinkled with sea salt.
**Day 7:**
– **Breakfast:** Chia seed pudding prepared with almond milk, topped with slices of mango.
– **Lunch:** Turkey and avocado sandwich on whole-grain bread with a side of mixed greens.
– **Dinner:** Baked cod served with lentils and asparagus.
– **Snack:** Pear slices served with ricotta cheese.
This meal plan is crafted to provide a range of flavors and textures, ensuring enjoyment during your meals while fulfilling your nutritional needs. Modify portion sizes and ingredients as necessary to accommodate your personal dietary requirements and tastes.

Revitalizing Pineapple Coconut Smoothie
**Maximizing Your Coconut Milk Enjoyment: Suggestions and Alternatives**
Coconut milk serves as a multifunctional ingredient that can enhance numerous meals with its deep flavor and smooth consistency. Nonetheless, not all coconut milk options are the same. To attain the finest coconut taste and creaminess, it is advisable to opt for canned coconut milk instead of the types available in cartons. Canned coconut milk usually boasts a greater fat content, which adds to its decadent texture and bold flavor. If you’re left with only carton coconut milk, you can improve its taste by incorporating extra shredded coconut as desired.
**Innovative Alternatives:**
Coconut milk complements fruits exceptionally well, and there are numerous ways to try out this pairing. A favored option is to mix coconut milk with bananas and pineapples. For a revitalizing variation, think about using a frozen banana and fresh pineapple, or the other way around. It’s crucial to make sure that at least one of the fruits is frozen to obtain a creamy texture.
**Adding Sweetness to Your Mixture:**
The inherent sweetness of pineapple and banana is usually adequate, but depending on their ripeness, you may wish to include a bit of sweetener. Maple syrup or honey can elevate the flavor without overwhelming the natural notes of the fruit. While many people find no need for extra sweetness, some mixtures could be improved with a small addition.
**Substitutes for Bananas:**
If you’re steering clear of bananas, there’s no need to fret. You can simply replace them with an additional cup of frozen pineapple. This change retains the creamy texture and tropical flavor essence, guaranteeing a delightful experience.
By implementing these suggestions and alternatives, you can fully utilize coconut milk in your culinary endeavors, relishing its complete potential in both flavor and consistency.

A Compilation of 30 Vegetarian Breakfast Dishes
Alex & Sonja: The Energetic Pair Behind A Couple Cooks
Introducing Alex and Sonja Overhiser, the inventive creators and food lovers behind the acclaimed food blog, A Couple Cooks. This real-life duo has been motivating home cooks since 2010 with their uncomplicated, seasonal recipes and enthusiasm for the craft of cooking. As the authors of two best-selling cookbooks, they have cemented their status as reliable voices in the realm of home cooking.
Alex and Sonja’s adventure began with a mutual passion for food and gastronomy. As dedicated parents, they recognize the hurdles of preparing nutritious, tasty meals amidst the fast pace of everyday life. Their blog, A Couple Cooks, emerged from a wish to make cooking enjoyable and accessible to everyone, irrespective of their cooking skills. Over the years, they have curated a vast array of original recipes, each delicately created and tested in their personal kitchen.
The couple’s cooking philosophy highlights the importance of fresh, seasonal ingredients, which not only elevate the taste of their meals but also support sustainability and well-being. Their recipes are tailored to be user-friendly, inspiring even the most inexperienced cooks to take to the kitchen and whip up something delightful. From hearty breakfasts to fulfilling dinners and everything else in between, Alex and Sonja have a recipe suited for every occasion.
Beyond recipes, A Couple Cooks provides an abundance of cooking advice and meal planning suggestions, aiding readers in optimizing their kitchen routines and maximizing their time and resources. The blog is a reflection of Alex and Sonja’s conviction that cooking should be a joyful, shared experience that unites people and encourages creativity.
What distinguishes Alex and Sonja is their authentic partnership, both in their personal lives and in the kitchen. Their collaboration shines through in every facet of their work, from the beautifully composed photographs to the captivating writing that accompanies each dish. Together, they have nurtured a thriving online community of food enthusiasts who express their love for cooking and enjoying good food.
As they persist in inspiring and educating through A Couple Cooks, Alex and Sonja uphold their dedication to spreading the happiness of cooking. Whether you’re an experienced chef or a beginner in the kitchen, their blog is an invaluable asset for anyone eager to delve into the realm of home cooking. Join Alex and Sonja on their culinary adventure and uncover the delightful possibilities that await in your own kitchen.

Honey-Glazed Turkey Dish
# Savor the Tastes of the Holidays with Honey Glazed Turkey
The festive season is an occasion for family reunions, joyful celebrations, and mouthwatering meals. A dish that always captivates is a gorgeously roasted turkey. This Honey Glazed Turkey recipe melds the rich flavors of turkey with a delightful honey glaze, making it an ideal centerpiece for any holiday gathering.
## Ingredients for the Recipe
– **Honey:** The key component for the glaze that brings sweetness to the turkey.
– **Paprika:** A subtly smoky taste incorporated into the turkey rub.
– **Boneless Turkey Breast:** Any size can be selected, with cooking time adjusted accordingly.
For a complete list of ingredients and their quantities, refer to the recipe card below.
## Preparing Honey Glazed Turkey
### Step 1:
Dry the turkey with paper towels.
### Step 2:
In a small bowl, mix all the spices designated for the turkey.
### Step 3:
Evenly apply the spice mixture across the turkey.
### Step 4:
Cover the turkey in plastic wrap and refrigerate for 30 minutes to 24 hours.
### Step 5:
Set your oven temperature to 325 degrees Fahrenheit.
### Step 6:
Position the turkey in a baking dish.
### Step 7:
Melt the butter and brush it generously over the turkey.
### Step 8:
Roast the turkey in the oven for 30 minutes.
### Step 9:
While the turkey is roasting, prepare the glaze. In a saucepan over medium-high heat, mix the honey, butter, Dijon mustard, salt, and pepper. Allow the mixture to bubble, then reduce to a simmer for 3 minutes.
### Step 10:
After 30 minutes of roasting, take the turkey out of the oven and apply ⅓ of the glaze over it.
### Step 11:
Bake for an additional 30 minutes, then take it out and apply another ⅓ of the glaze over the turkey.
### Step 12:
Continue baking for another 15 minutes or until the turkey’s internal temperature reaches 165 degrees Fahrenheit, then remove from the oven.
### Step 13:
Pour the remaining glaze over the turkey.
### Step 14:
Let the honey-roasted turkey rest for 10-15 minutes before slicing. Then, serve and relish!
## Professional Tips
– **Turkey Netting:** While using netting on the turkey is optional, cooking it with netting will give your turkey the traditional appearance with the characteristic indentations.
– **Turkey Drippings:** On special occasions, you can utilize the pan drippings from the turkey to create a flavorful gravy!
## Frequently Asked Questions
**How long should I roast my turkey if it exceeds 3 pounds?**
A general guideline is to cook for 20-30 minutes per pound of turkey. Larger turkey breasts may brown quicker; if the skin appears to darken too fast, cover the top with foil. For turkey breasts larger than about 4 pounds, postpone adding the glaze until the last 45–60 minutes of roasting.
**What can accompany this Honey Glazed Turkey recipe?**
Mashed potatoes and roasted veggies pair excellently with this turkey. You can also slice the turkey for sandwiches and enjoy it alongside a comforting soup.
## Storage Guidelines
Store any leftovers of this honey glazed turkey in a sealed container in your refrigerator for up to 4 days. To freeze, wrap it in plastic wrap and aluminum foil, placing it in a sealed container or freezer bag in your freezer for up to 3 months.
To reheat, set your oven to 300 degrees Fahrenheit and warm for 20-30 minutes, or use the microwave until heated thoroughly.
## Additional Recipes To Explore
For more delectable recipes to enhance your holiday meal, discover various dishes that can elevate your dining experience.
Savor your Honey Glazed Turkey and the tastes of the holiday season!

Effective Weeknight Dinner: Fast and Tasty Chicken Fajitas Recipe
# Sheet Pan Chicken Fajitas: A Fast and Simple Dinner Option
Sheet pan chicken fajitas are an excellent choice for hectic evenings when you crave a tasty meal with little cleanup. This one-pan meal allows all the ingredients to cook simultaneously, making it effortless to serve and enjoy. Set out tortillas and toppings, and let everyone create their own fajitas for an engaging dining experience.
## Flavor Profile
These fajitas offer a delightful mix of smoky and tangy flavors with a touch of sweetness. The succulent chicken, vibrant lime, and caramelized peppers yield a bold and comforting taste that will fulfill your cravings.
## Skill Level
Preparing sheet pan chicken fajitas is incredibly simple. With just a few easy steps—seasoning, slicing, and roasting—you can have a scrumptious dish ready in no time.
## Make Ahead
To save time, you can prepare the ingredients beforehand. Cut the vegetables and combine them with the seasoning up to one day before cooking. This allows you to just place everything in the oven when it’s time to eat.
## Ingredient Swaps
Feel free to personalize your fajitas! You can use taco seasoning or ready-made fajita seasoning for convenience. If you enjoy a bit of heat, consider incorporating fresh jalapeños or cayenne pepper.
## Serving Suggestions
These fajitas are adaptable and can be enjoyed in different ways. Serve them in warm tortillas, or experiment with rice bowls, salads, or quesadillas for a different take.
## What You’ll Need
– **Chicken**: For the juiciest outcomes, slice boneless chicken against the grain. Boneless chicken thighs are a great substitute, as they stay tender during cooking.
– **Veggies**: Yellow onions provide a sweeter flavor, while red onions deliver a sharper one. Use a mix of bell peppers for visual appeal and added sweetness.
– **Seasonings**: A mix of warm spices and smokiness is crucial. You can double the seasoning recipe to keep some on hand for future meals or choose store-bought seasoning.
## How to Make Sheet Pan Fajitas
1. **Mix Seasonings**: In a bowl, combine olive oil, lime juice, chili powder, salt, cumin, smoked paprika, onion powder, black pepper, and garlic powder.
2. **Prepare Ingredients**: Slice the chicken and vegetables, then add them to the bowl with the seasonings and stir well.
3. **Bake**: Spread the mixture on a large baking sheet and bake at 425°F for about 15 minutes, or until the chicken achieves an internal temperature of 165°F. For a charred finish, broil for an additional 3-5 minutes.
Serve the fajitas hot in warm tortillas with toppings like sour cream, salsa, pickled jalapeños, and cheese.
## Tips for Success
– Ensure that the chicken and vegetables are cut to similar sizes for uniform cooking.
– Avoid overcrowding the sheet pan; use an extra-large rimmed baking sheet or multiple pans if necessary.
– For a restaurant-style char, broil the fajitas for a few minutes at the end of cooking.
– Warm tortillas in foil in the oven or use a tortilla warmer to keep them soft.
## Storing and Reheating
Leftover fajitas can be stored in an airtight container in the refrigerator for up to 4 days. Reheat in a skillet or microwave until warmed through. For longer storage, freeze the chicken and peppers together for up to 2 months. Thaw in the fridge and reheat in a hot skillet to regain texture.
## Conclusion
Sheet pan chicken fajitas are a quick, easy, and flavorful dish perfect for busy evenings. With minimal cleanup and the flexibility for everyone to customize their own, it’s a win-win for families and gatherings alike. Enjoy this delightful Tex-Mex meal any night of the week!
Read More
Weekly Meal Schedule: Protein-Rich and Fiber-Enriched Diet
**Weekly Meal Plan: Protein-Rich and Fiber-Rich Diet**
Incorporating a protein-rich and fiber-rich diet can serve as a beneficial method for individuals aiming to enhance their general well-being, support muscle development, and improve digestion. This meal plan offers a well-rounded strategy for achieving these nutritional objectives, guaranteeing that each day is filled with appetizing and healthful choices.
**Day 1:**
– **Breakfast:** Greek yogurt parfait featuring assorted berries and a dash of chia seeds.
– **Lunch:** Grilled chicken salad comprising mixed greens, cherry tomatoes, cucumbers, and balsamic vinaigrette.
– **Dinner:** Baked salmon accompanied by quinoa and steamed broccoli.
– **Snack:** Slices of apple served with almond butter.
**Day 2:**
– **Breakfast:** Scrambled eggs with spinach and feta cheese, alongside whole-grain toast.
– **Lunch:** Lentil soup paired with whole-grain crackers.
– **Dinner:** Turkey stir-fry featuring bell peppers, snap peas, and brown rice.
– **Snack:** Carrot sticks served with hummus.
**Day 3:**
– **Breakfast:** Overnight oats made with almond milk, topped with banana slices and walnuts.
– **Lunch:** Quinoa and black bean salad enriched with avocado and lime dressing.
– **Dinner:** Grilled shrimp tacos served with cabbage slaw and corn tortillas.
– **Snack:** Cottage cheese paired with pineapple chunks.
**Day 4:**
– **Breakfast:** Smoothie blending spinach, protein powder, banana, and almond milk.
– **Lunch:** Chickpea and avocado wrap in a whole-grain tortilla.
– **Dinner:** Baked chicken breast served with roasted sweet potatoes and green beans.
– **Snack:** A mix of nuts and seeds.
**Day 5:**
– **Breakfast:** Whole-grain pancakes topped with fresh berries and a scoop of Greek yogurt.
– **Lunch:** Tuna salad combined with mixed greens, cherry tomatoes, and lemon vinaigrette.
– **Dinner:** Beef and vegetable stir-fry with brown rice.
– **Snack:** Celery sticks served with peanut butter.
**Day 6:**
– **Breakfast:** Omelet featuring mushrooms, tomatoes, and cheese, served with a side of fruit.
– **Lunch:** Quinoa bowl filled with roasted vegetables and tahini dressing.
– **Dinner:** Grilled pork chops with barley and sautéed spinach.
– **Snack:** Edamame sprinkled with sea salt.
**Day 7:**
– **Breakfast:** Chia seed pudding prepared with almond milk, topped with slices of mango.
– **Lunch:** Turkey and avocado sandwich on whole-grain bread with a side of mixed greens.
– **Dinner:** Baked cod served with lentils and asparagus.
– **Snack:** Pear slices served with ricotta cheese.
This meal plan is crafted to provide a range of flavors and textures, ensuring enjoyment during your meals while fulfilling your nutritional needs. Modify portion sizes and ingredients as necessary to accommodate your personal dietary requirements and tastes.
Read More
Revitalizing Pineapple Coconut Smoothie
**Maximizing Your Coconut Milk Enjoyment: Suggestions and Alternatives**
Coconut milk serves as a multifunctional ingredient that can enhance numerous meals with its deep flavor and smooth consistency. Nonetheless, not all coconut milk options are the same. To attain the finest coconut taste and creaminess, it is advisable to opt for canned coconut milk instead of the types available in cartons. Canned coconut milk usually boasts a greater fat content, which adds to its decadent texture and bold flavor. If you’re left with only carton coconut milk, you can improve its taste by incorporating extra shredded coconut as desired.
**Innovative Alternatives:**
Coconut milk complements fruits exceptionally well, and there are numerous ways to try out this pairing. A favored option is to mix coconut milk with bananas and pineapples. For a revitalizing variation, think about using a frozen banana and fresh pineapple, or the other way around. It’s crucial to make sure that at least one of the fruits is frozen to obtain a creamy texture.
**Adding Sweetness to Your Mixture:**
The inherent sweetness of pineapple and banana is usually adequate, but depending on their ripeness, you may wish to include a bit of sweetener. Maple syrup or honey can elevate the flavor without overwhelming the natural notes of the fruit. While many people find no need for extra sweetness, some mixtures could be improved with a small addition.
**Substitutes for Bananas:**
If you’re steering clear of bananas, there’s no need to fret. You can simply replace them with an additional cup of frozen pineapple. This change retains the creamy texture and tropical flavor essence, guaranteeing a delightful experience.
By implementing these suggestions and alternatives, you can fully utilize coconut milk in your culinary endeavors, relishing its complete potential in both flavor and consistency.
Read More
A Compilation of 30 Vegetarian Breakfast Dishes
Alex & Sonja: The Energetic Pair Behind A Couple Cooks
Introducing Alex and Sonja Overhiser, the inventive creators and food lovers behind the acclaimed food blog, A Couple Cooks. This real-life duo has been motivating home cooks since 2010 with their uncomplicated, seasonal recipes and enthusiasm for the craft of cooking. As the authors of two best-selling cookbooks, they have cemented their status as reliable voices in the realm of home cooking.
Alex and Sonja’s adventure began with a mutual passion for food and gastronomy. As dedicated parents, they recognize the hurdles of preparing nutritious, tasty meals amidst the fast pace of everyday life. Their blog, A Couple Cooks, emerged from a wish to make cooking enjoyable and accessible to everyone, irrespective of their cooking skills. Over the years, they have curated a vast array of original recipes, each delicately created and tested in their personal kitchen.
The couple’s cooking philosophy highlights the importance of fresh, seasonal ingredients, which not only elevate the taste of their meals but also support sustainability and well-being. Their recipes are tailored to be user-friendly, inspiring even the most inexperienced cooks to take to the kitchen and whip up something delightful. From hearty breakfasts to fulfilling dinners and everything else in between, Alex and Sonja have a recipe suited for every occasion.
Beyond recipes, A Couple Cooks provides an abundance of cooking advice and meal planning suggestions, aiding readers in optimizing their kitchen routines and maximizing their time and resources. The blog is a reflection of Alex and Sonja’s conviction that cooking should be a joyful, shared experience that unites people and encourages creativity.
What distinguishes Alex and Sonja is their authentic partnership, both in their personal lives and in the kitchen. Their collaboration shines through in every facet of their work, from the beautifully composed photographs to the captivating writing that accompanies each dish. Together, they have nurtured a thriving online community of food enthusiasts who express their love for cooking and enjoying good food.
As they persist in inspiring and educating through A Couple Cooks, Alex and Sonja uphold their dedication to spreading the happiness of cooking. Whether you’re an experienced chef or a beginner in the kitchen, their blog is an invaluable asset for anyone eager to delve into the realm of home cooking. Join Alex and Sonja on their culinary adventure and uncover the delightful possibilities that await in your own kitchen.
Read More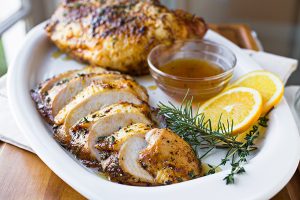
Honey-Glazed Turkey Dish
# Savor the Tastes of the Holidays with Honey Glazed Turkey
The festive season is an occasion for family reunions, joyful celebrations, and mouthwatering meals. A dish that always captivates is a gorgeously roasted turkey. This Honey Glazed Turkey recipe melds the rich flavors of turkey with a delightful honey glaze, making it an ideal centerpiece for any holiday gathering.
## Ingredients for the Recipe
– **Honey:** The key component for the glaze that brings sweetness to the turkey.
– **Paprika:** A subtly smoky taste incorporated into the turkey rub.
– **Boneless Turkey Breast:** Any size can be selected, with cooking time adjusted accordingly.
For a complete list of ingredients and their quantities, refer to the recipe card below.
## Preparing Honey Glazed Turkey
### Step 1:
Dry the turkey with paper towels.
### Step 2:
In a small bowl, mix all the spices designated for the turkey.
### Step 3:
Evenly apply the spice mixture across the turkey.
### Step 4:
Cover the turkey in plastic wrap and refrigerate for 30 minutes to 24 hours.
### Step 5:
Set your oven temperature to 325 degrees Fahrenheit.
### Step 6:
Position the turkey in a baking dish.
### Step 7:
Melt the butter and brush it generously over the turkey.
### Step 8:
Roast the turkey in the oven for 30 minutes.
### Step 9:
While the turkey is roasting, prepare the glaze. In a saucepan over medium-high heat, mix the honey, butter, Dijon mustard, salt, and pepper. Allow the mixture to bubble, then reduce to a simmer for 3 minutes.
### Step 10:
After 30 minutes of roasting, take the turkey out of the oven and apply ⅓ of the glaze over it.
### Step 11:
Bake for an additional 30 minutes, then take it out and apply another ⅓ of the glaze over the turkey.
### Step 12:
Continue baking for another 15 minutes or until the turkey’s internal temperature reaches 165 degrees Fahrenheit, then remove from the oven.
### Step 13:
Pour the remaining glaze over the turkey.
### Step 14:
Let the honey-roasted turkey rest for 10-15 minutes before slicing. Then, serve and relish!
## Professional Tips
– **Turkey Netting:** While using netting on the turkey is optional, cooking it with netting will give your turkey the traditional appearance with the characteristic indentations.
– **Turkey Drippings:** On special occasions, you can utilize the pan drippings from the turkey to create a flavorful gravy!
## Frequently Asked Questions
**How long should I roast my turkey if it exceeds 3 pounds?**
A general guideline is to cook for 20-30 minutes per pound of turkey. Larger turkey breasts may brown quicker; if the skin appears to darken too fast, cover the top with foil. For turkey breasts larger than about 4 pounds, postpone adding the glaze until the last 45–60 minutes of roasting.
**What can accompany this Honey Glazed Turkey recipe?**
Mashed potatoes and roasted veggies pair excellently with this turkey. You can also slice the turkey for sandwiches and enjoy it alongside a comforting soup.
## Storage Guidelines
Store any leftovers of this honey glazed turkey in a sealed container in your refrigerator for up to 4 days. To freeze, wrap it in plastic wrap and aluminum foil, placing it in a sealed container or freezer bag in your freezer for up to 3 months.
To reheat, set your oven to 300 degrees Fahrenheit and warm for 20-30 minutes, or use the microwave until heated thoroughly.
## Additional Recipes To Explore
For more delectable recipes to enhance your holiday meal, discover various dishes that can elevate your dining experience.
Savor your Honey Glazed Turkey and the tastes of the holiday season!
Read More
Oven-Roasted Potatoes Garnished with Crunchy Broccoli and Bacon
### The Warmth of Baked Potatoes: A Comfortable Dinner Choice
Baked potatoes, fondly referred to as “jacket potatoes” in the UK, present a straightforward yet fulfilling dining option that frequently goes unnoticed. They are inviting, effortless, and can be adorned with an array of toppings, rendering them a flexible option for dinner.
#### The Allure of Baked Potatoes
Baked potatoes serve more than just as a side; they can take center stage in your meal. Typically garnished with butter, cheddar cheese, sour cream, bacon pieces, and chives, they provide a soothing mix of tastes and textures. Nevertheless, for individuals eager to include more vegetables in their diets, baked potatoes can be upgraded with healthful toppings.
#### A Veggie Upgrade: Broccoli and Bacon
A charming method to enhance the traditional baked potato is by incorporating roasted broccoli and bacon. This mix not only contributes a robust vegetable element but also introduces a savory crunch that complements the fluffy potato. Roasting the broccoli and bacon together allows the flavors to meld, creating a dish that is both fulfilling and enjoyable.
#### The Ideal Method to Load a Baked Potato
To guarantee your baked potato is perfectly loaded, adhere to this step-by-step tutorial:
1. **Prep the Potato**: Begin with a baked potato that has been split open to display its soft inside.
2. **Include Butter**: Add a generous knob of butter within, letting it melt into the potato.
3. **Season**: Sprinkle with salt and pepper to your liking.
4. **Cheese**: Incorporate sharp orange cheddar cheese, which will melt wonderfully.
5. **Crispy Elements**: Top with crunchy bacon and roasted broccoli, letting them settle into the melted cheese.
6. **Sour Cream**: Crown with a scoop of sour cream for added creaminess.
7. **Final Enhancements**: Conclude with a sprinkle of salt, pepper, and a hearty amount of minced chives.
For families with kids, try a playful variation: once most toppings are gone, press the potato back together and eat it like a taco!
#### Recipe: Baked Potatoes with Crunchy Broccoli and Bacon
**Ingredients**:
– 4 russet potatoes (about 8 ounces each), thoroughly cleaned
– Olive oil
– Kosher salt and freshly ground black pepper
– 1 pound fresh broccoli, chopped into 1-inch pieces
– 4 ounces bacon (approximately 4 slices), diced
– Butter
– Sharp orange cheddar, roughly grated
– Sour cream
– Minced fresh chives
**Instructions**:
1. **Bake the Potatoes**: Preheat your oven to 450°F (230°C). Pierce each potato multiple times with a fork and lightly coat with olive oil. Season with salt and pepper. Bake directly on the oven rack for 45 minutes to 1 hour, until easily pierced with a skewer.
2. **Roast the Broccoli and Bacon**: Combine broccoli with olive oil, salt, and pepper on a baking sheet. Mix in diced bacon. After 15 minutes of baking the potatoes, add the broccoli and bacon to the oven. Roast for 25 to 30 minutes until the bacon is crispy and the broccoli is charred, turning occasionally.
3. **Serve**: When the potatoes are ready, carefully open them and fill with butter, salt, pepper, cheddar cheese, roasted broccoli, bacon, sour cream, chives, and additional seasoning. Enjoy right away.
### Conclusion
Baked potatoes present a tasty and soothing meal that can be effortlessly tailored to fit your preferences. By adding roasted broccoli and bacon, you not only boost the flavor but also introduce a healthy component to this traditional dish. So, the next time you’re considering dinner, think about revisiting the baked potato for a warm and gratifying meal.
Read More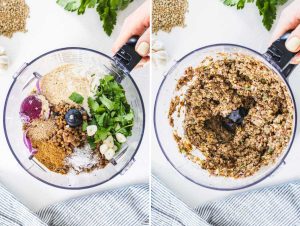
Homemade Lentil Patty Recipe
Lentil enthusiasts, these lentil patties are just for you! These robust meat-free burgers are crafted with recognizable and nourishing ingredients, setting them apart from many current store-bought varieties. While my Favorite Veggie Burgers remain my top choice, these lentil patties follow closely behind.
These patties are seasoned with shredded carrot, fresh cilantro or parsley, onion and garlic, along with spices such as chili powder, cumin, salt and pepper. Two eggs are optional (omit for vegan patties), but they add extra moisture and a lighter texture.
The recipe comes together seamlessly in the food processor. Similar to my veggie patties, these lentil patties are best when baked in the oven, which is a more efficient and straightforward approach compared to skillet cooking. They emerge beautifully golden and firm enough to maintain their shape within a bun.
Lentil Patty Serving Suggestions
These patties are best enjoyed with bold toppings, such as an herbed avocado sauce and pickles. You might also serve these patties without bread, perhaps on a green salad or over cooked brown rice, farro or quinoa with some of the topping ideas provided below. Freeze any leftover patties for a quick protein and fiber boost in future meals.
– Buns or bread of choice, such as hamburger buns, English muffins or even flatbread. Lightly toast them for added texture.
– Sauce, like guacamole (as shown here), avocado pesto, avocado dip, green goddess tahini dip, ketchup, mayo or mustard.
– Greens, including crisp lettuce, arugula or spinach.
– Add crunch with dill pickles, quick-pickled red onions, or thinly sliced radishes or cucumbers.
– Sliced ripe tomato, only when in season!
Lentil Tips
This recipe requires 2 1/2 cups of regular greenish-brown lentils. You can prepare them yourself, or utilize canned lentils or steamed lentils from Trader Joe’s. Regardless of the cooking method, spread them on a paper towel to absorb excess moisture before using. If you have leftover lentils, toss them into a green salad this week.
More Hearty Meatless Mains
Here are some additional bean and lentil-based recipes to explore:
Please share how your lentil patties turn out in the comments! I enjoy hearing from you and hope this recipe becomes a beloved staple for you.
Lentil Veggie Patties
These meat-free lentil patties are hearty, flavorful, and maintain their shape well. They come together effortlessly in the food processor. Bake them to golden perfection, and freeze the leftovers for later. Recipe yields 8 veggie patties.
Lentil Patties
Patty assembly suggestions
– 8 buns of choice (hamburger buns, English muffins or flatbread), toasted
– Sauce: Guacamole, Avocado Pesto, Avocado Dip, Green Goddess Tahini Dip, ketchup, mayonnaise or mustard
– Greens: Lettuce, arugula or spinach
– Add some crunch: Dill pickles, quick-pickled red onions, or thinly sliced radishes or cucumbers
– Tomato slices
Instructions
1. Preheat the oven to 400 degrees Fahrenheit. Line a large, rimmed baking sheet with parchment paper for easy clean-up.
2. Drain the lentils thoroughly in a colander, then measure 2 ½ cups and spread them across a lint-free tea towel or paper towels to dry (if you have extra lentils, set them aside for another use).
3. To prepare the patties: Slice the halved onion into a few sections before adding the onion and garlic cloves to the food processor. Pulse until the onions are coarsely chopped, but not pureed.
4. Add to the food processor: towel-dried lentils, eggs, oats, a handful of herbs (optional), chili powder and cumin, salt and black pepper. Process until the mixture resembles chunky hummus (err on the side of caution here). Mix in the grated carrot by hand.
5. To form the patties: Divide the lentil mixture into 8 equal parts using about ½ cup each. Shape them into patties about 1-inch thick. (If your mixture is too wet to shape, stir in a couple of tablespoons of your preferred flour, or more as necessary.)
6. Brush both sides of each patty generously with oil and arrange them on the prepared baking sheet, ensuring a few inches of space between them. Bake until the patties are nicely golden on the outside, about 35 minutes, flipping halfway through.
7. To assemble the patties: Toast your buns if desired. Begin with the lower bun topped with lettuce, if using, followed by a veggie patty, then spread a generous layer of guacamole or sauce on top. Add crunchy condiments and tomato, and enjoy!
8. Leftover patties

Recipe for Blueberry Muffins from Jordan Marsh
### Dreamy Blueberry Muffins: A Gastronomic Pleasure
These blueberry muffins are a scrumptious delight, notable for their cake-like consistency, moisture, and bursts of blueberry jammy sweetness, finished with a crispy sugary topping. The idea for these muffins emerged during a stroll when a sudden desire hit, prompting an impromptu trip to a bakery. During a conversation about muffin favorites, it was uncovered that blueberry muffins were a top choice due to their sentimental value, especially the iconic Jordan Marsh recipe.
#### The Heritage of Jordan Marsh
Jordan Marsh was a famous New England department store, particularly celebrated for its blueberry muffins offered at the bakery in its flagship Boston store. These muffins were famed for their size and irresistible nature, leading many to make special journeys just to indulge. The recipe has since evolved into a treasured classic among muffin aficionados.
#### How to Bake Blueberry Muffins
Making these muffins is a simple procedure that produces delightful outcomes. Here’s a guide to follow:
1. **Cream the Butter and Sugar**: Mix 1/4 cup of unsalted butter and 1/2 cup plus 2 tablespoons of sugar until light and airy. Incorporate 1 large egg and 1/2 teaspoon of vanilla extract, blending thoroughly.
2. **Sift Dry Ingredients**: In another bowl, combine 1 cup of all-purpose flour, 1/4 teaspoon of kosher salt, and 1 teaspoon of baking powder by sifting.
3. **Combine Mixtures**: Gradually incorporate the dry ingredients into the creamed mixture, alternating with 1/4 cup of milk, commencing and concluding with the flour mixture.
4. **Fold in Blueberries**: Carefully fold in 1 cup of rinsed and dried blueberries.
5. **Prepare Muffin Tin**: Line a standard muffin tin with 6 liners and distribute the batter into each. Top with coarse sanding sugar for added texture.
6. **Bake**: Set the oven to 375°F and bake for 30-35 minutes, or until the tops are golden and a toothpick inserted into the center comes out clean.
7. **Cool and Savor**: Once baked, take the muffins out of the tin, let them cool, and enjoy!
#### What is Sanding Sugar?
Sanding sugar is a coarse sugar that provides a delightful crunch and sweetness to baked items. Although not mandatory, it enhances the muffins’ texture and flavor. It can be found in most grocery stores or online.
#### Blueberry Season
The prime season for blueberries differs by area. In the southern U.S., it generally spans from May to July, while in northern states, it may last into October. During the winter months, blueberries are frequently brought in from the southern hemisphere, making frozen blueberries a practical option. When using frozen, allow them to thaw and coat them in flour to avoid the batter turning purple.
#### Wild vs. Cultivated Blueberries
Most blueberries found in stores are cultivated (highbush), while wild blueberries (lowbush) present a more potent flavor and greater antioxidant levels. If you come across wild blueberries, they are worth sampling for a distinct taste experience.
#### Muffin Tins
Although a standard muffin pan is optimal, other baking containers can work equally well. Individual tins or even parchment paper can serve to create muffins without conventional liners, offering flexibility in presentation.
### Blueberry Muffin Recipe
**Servings**: 6
**Ingredients**:
– 1/4 cup unsalted butter (at room temperature)
– 1/2 cup + 2 tbsp sugar
– 1 large egg
– 1/2 tsp vanilla extract
– 1 cup all-purpose flour
– 1/4 tsp kosher salt
– 1 tsp baking powder
– 1/4 cup milk
– 1 cup blueberries (washed and dried)
– 1 tbsp coarse sanding sugar (for topping)
**Instructions**:
1. Preheat the oven to 375°F. Cream butter and sugar until fluffy. Add the egg and vanilla.
2. Sift flour, salt, and baking powder; mix into the creamed mixture, alternating with milk.
3. Gently fold in the blueberries.
4. Line the muffin tin with 6 liners, fill with batter, and sprinkle with sanding sugar.
5. Bake for 30-35 minutes until golden. Cool and savor!
**Nutrition Facts** (per muffin):
– Calories: 258
– Fat: 8.7g
– Saturated Fat: 5.8g
– Cholesterol: 52mg
– Sodium: 30mg
– Carbohydrates: 42.4g
– Fiber: 1.2g
– Sugar: 25g
– Protein: 3.7g
These blueberry muffins are not merely a dessert but a sentimental journey back to the cherished flavors of Jordan Marsh, making them an ideal complement to any breakfast or
Read More
Crispy Beef Taco Recipe
**The Wanderlust Kitchen: A Culinary Adventure Around the World**
In a realm where culinary delights are frequently confined to regional tastes, The Wanderlust Kitchen invites food lovers to undertake a worldwide gastronomic journey. Established by Linda, this lively platform is committed to sharing a wide variety of recipes and travel narratives that honor the rich diversity of culinary heritage from different cultures.
### A Tribute to Authenticity and Creativity
At The Wanderlust Kitchen, authenticity is central to every recipe. Linda carefully selects dishes that respect traditional cooking techniques while also incorporating contemporary methods and ingredients. This distinct combination enables home cooks to delve into the essence of international cuisines without forgoing the ease of modern cooking styles.
### Recipes That Spark Adventure
The recipes highlighted on The Wanderlust Kitchen aim to motivate culinary discovery. From the zesty street foods of Southeast Asia to the heartwarming classics of European kitchens, every dish narrates a tale. Linda inspires her audience to venture beyond their culinary boundaries and explore new flavors, textures, and cooking approaches. Whether it’s perfecting the craft of homemade pasta or trying out unique spices, each recipe acts as a ticket to a new locale.
### Food and Travel: A Harmonious Duo
Food and travel are deeply connected, and The Wanderlust Kitchen seamlessly merges these two passions. Linda not only shares recipes but also recounts her travel experiences, offering readers a look into the cultures and customs that influence the dishes. Her vivid storytelling whisks readers away to lively markets, charming cafés, and colorful street food scenes, making the act of cooking feel like an adventure in itself.
### Community and Connection
The Wanderlust Kitchen is more than merely a recipe blog; it’s a community of individuals with a shared enthusiasm for food and travel. Linda cultivates a space where readers can engage, share their own culinary journeys, and uplift one another. Through comments, social media engagement, and community challenges, the kitchen transforms into a hub of innovation and encouragement.
### Bon Appétit! Bon Voyage!
With a cordial greeting of “Bon Appétit! Bon Voyage!”, Linda embodies the essence of The Wanderlust Kitchen. Each recipe is not merely a dish; it’s a chance to discover the world from the comfort of your kitchen. Whether you’re an experienced chef or a beginner, The Wanderlust Kitchen provides something for everyone, inspiring all to relish the pleasure of cooking and the excitement of travel.
In summary, The Wanderlust Kitchen is a treasure chest for those aiming to broaden their culinary vistas. With Linda as your guide, you can set off on a delightful journey that honors the splendor of food and the thrill of discovery. So don your apron, open your mind, and prepare to explore the world one recipe at a time!
Read More
The Ultimate Closet Cooking 2026: An Exciting New Cookbook Launch
Happy New Year!
What could be a better way to kick off the New Year than by offering my new cookbook, The Best of Closet Cooking 2026, at no cost! This cookbook features the 25 most delicious and sought-after new recipes from Closet Cooking in 2025. The Best of Closet Cooking 2026 is available entirely for free to subscribers of the complimentary Closet Cooking email newsletter, which sends all the newest delightful recipes directly to your inbox, just out of the oven!
If you are already on the list for the Closet Cooking email newsletter, check for the link to download the cookbook in today’s newsletter! If not:
Alternatively, you can purchase the ecookbook here:
You can acquire the softcover edition on Amazon:
Read More